How to Install and Configure MySQL Database Server and Run Your First Database test (Part 1)
- Oct 16, 2022
- 5 min read
Updated: Oct 31, 2023
Kenneth Etuk @K.Etuk/ 7:00 PM EDT. October 14, 2022.
Do you Want to Install and Configure MySQL database?

MySQL is one of the most widely used open source relational database management systems, powering both what is arguably the most popular and longstanding web hosting company of all time, as well as a whole host of other high-profile businesses. This guide will teach you how to setup and run your first MySQL database server running on Ubuntu 16.04 LTS.
MySQL is a popular and feature-rich open source relational database management system (RDBMS) designed by MySQL AB. This tutorial will walk you through the basic steps of installing a MySQL database server, setting up a database and using phpMyAdmin to manage the data that you'll store in it.
How do you install and configure MySQL? I'm sure most people would probably be asking that question. These are the main steps you need to follow in order to get your database server running, your first database and so on. This is a straightforward step-by-step guide from installation to troubleshooting to advanced optimizations.
Installing and configuring a MySQL database server can be a daunting task for some. The goal of this article is to provide a step-by-step guide for installing and configuring MySQL on CentOS 7.
What is a Database and Database Management (DBMS).
A database is an organized collection of structured information, or data, typically stored electronically in a computer system. A database is usually controlled by a database management system (DBMS).
MySQL database server is a database management system that allows you to store data in a database and access it from multiple computers. MySQL is an open-source database server that runs on Linux, Mac OS X and Microsoft Windows operating systems.
A database provides a centralized place for organizations to store information relating to their business transactions. Database is the bedrock of digital transactions, and it is the single most important components of the online ecosystem. IT companies, financial brokers, banks, insurance companies, hospitals, schools, and e-commerce businesses, etc. all rely on one form of database or another for their service delivery.
Because of the critical and crucial role databases play, organizations who deploy them go to great length to ensure their database performs optimally and securely. And the metrics to determine database performance is often validated during database testing. Database testing is a backend test that checks the schema, tables, triggers, etc. of a database under test. It also checks data integrity and consistency.
It may involve creating and sending complex queries directly to the database and reviewing the consistency and correctness of the responses returned by the database. Database testing also involves load/stress testing the database and checking its responsiveness.
As a database tester, you will have to understand Structured Query Language (SQL) and be able to use it to manipulate the database under test. Still as a database tester, you will be required to know how to work with different database applications such as MySQL, MS SQL Server, Oracle database, and MongoDB, etc. Organization’s databases are typically hosted on a dedicated remote server(s) and testers usually perform secure remote connection to the database for the purpose of testing it.
As a tester in training, without any organization’s infrastructure to work within however, you will have to install a database server and client on the same computer for the purpose of test practice. This first blog post in this series is intended to show you how to install and configure MySQL server on a Windows machine for the purpose of testing. We would be demonstrating the process using MySQL server on a Windows 10 machine, but this can work for most operating systems really..
Downloading MySQL database package
Point your browser at the MySQL website at the URL: https://www.mysql.com/
Click on Downloads

3. Click on MySQL Community Downloads

4. Select MySQL Community Server

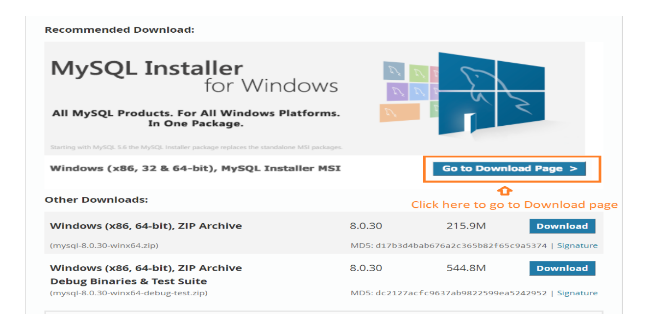
5. Click on Go to Download Page at Windows Installer MSI

6. On the next page choose between online or offline installation. We will choose offline installation

7. On the next page, if you have an Oracle account you can login, else you can choose to just start downloading.

8. Your download should start. Wait for your download to complete and show up in the Download folder.

How to Install MySQL database Server
Locate downloaded MySQL package and double-click on it to open it.
On the first installation window, click on Custom radio button then click on Next

3. On the select Products screen, you need to move all applicable products from the Available Products box to the Products to be Installed box.
To begin, click and expand MySQL Servers product and select the product matching your operating system. Next, click the forward arrow between the two boxes to move the product to the next box.

Repeat the process for Application, MySQL Connectors and Documentation. When you have finished, the Product to be Installed box should look like the image below:
4. On the next page click on Execute.
5. The installation should proceed, and you should see the installation progress as in the image below:

Once the installation is complete, as in the image below, click on Next to begin the configuration process

Configuring MySQL database Server
On the first Product Configuration page click on Next

2. On the Type and networking page leave the default settings and click Next

3. On the Authentication Method page leave the recommended setting and click Next
4. On the Accounts and Roles page, enter your root user password and confirm the password. You can add other users if you wish, otherwise just click Next

5. On the Window service page, leave the Configure MySQL as a Window service checkbox checked. You can change the Window service name, but I recommend you leave the default name. You should uncheck the Start MySQL server at System start-up (It is checked in the example). Click the Standard System Account radio button then click the Next button.

6. On the Apply Configuration page click on the Next button

7. Wait for the configurations to be applied then click on Finish

8. On the Connect to Server page check the MySQL Server checkbox. Click the Check credentials button to validate the login credentials and click on Next.

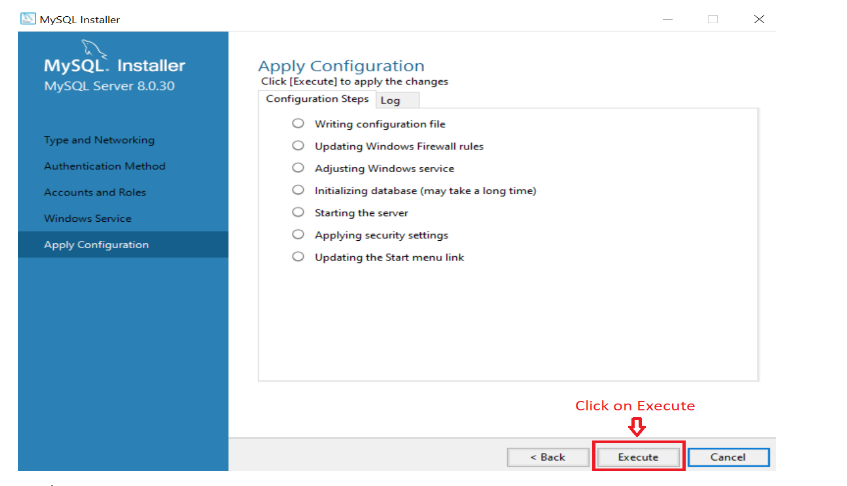
9. On the next Apply Configuration page click on the Execute button.

10. Next click on Finish on the next page

11. On the Installation Complete page, click on Finish

Once you complete this stage, your MySQL Server is installed, configured, and ready to be used. The next blog post will show you how to connect to MySQL Server, create a database and schema, populate it with data and perform your first database test.
Starting a project with a new language can be overwhelming, especially if you're unfamiliar with it. That's why we put together this installation guide. Hopefully this guide will give you all the information you need to successfully install MySQL and get your first database up and running.
We have explained the installation of the MySQL server and showed how you can run your first database on it. The whole installation is very easy to do: just download the installer from the official website and follow its instructions. And that's all! Enjoy
Another way of becoming better and understand how to install, configure and use MySQL better is to learn more about it and become a Software Tester. You can get started with our software testing course which covers the fundamentals of Manual testing, mobile, web service, SQL and automation. Not only will you learn what you need to succeed, but you could be eligible to obtain hands-on experience with our in-house paid co-op (not guaranteed), which will help you blow the competition away. If you're ready to land your dream job, click here to see our next schedule.
Kommentare